

As a design studio, from time to time, topright are asked to draw characters for clients. Obviously to draw characters you have to know how to draw and have an eye for characterisation. We recently drew a character to accompany a brand and a logo that we produced for a new restaurant chain. The character we created is a caveman. In this short tutorial I am going to teach you how to draw this character step by step using accompanying images to help you along. Hopefully this will be the first of many great drawings that you can add to a bank of drawings to pull out of the hat and impress you friends with. Good luck!
How to draw – STEP 1
Starting the drawing.
When we start a drawing it is important that the marks you use are light and a guide So if you make a mistake you can easily erase them or work over them without impacting greatly on the paper you are using. It is very important that these guides you draw are the most accurate part of your drawing. The early stages of any drawing involves breaking the illustration down into some big shapes from which we can the use as a guide to draw in the detail later. The first shape we will draw is a guide for the head. Be sure to copy not only the shape but the position of the guide on the page. This first shape is almost a circle, fractionally wider than tall. Learning how to draw is all about patience and checking what you have done, then looking again. Although this first guide is a simple shape on a page, make sure you are happy that it is correct and that your representation of it is accurate before moving on.

How to draw – STEP 2
Getting the guide shapes right
The next step is putting three more guide shapes in. These guide shapes are for the arms of the character. Try to concentrate on the relationships between these shapes. Where do they intersect? How big are they in relation to each other? The shape and relationships of these guides are very important, they are far more elliptical than the first circle that you drew. Draw lightly with a pencil, don’t be frightened of making a mistake, that’s how we learn.

How to draw – STEP 3
Adding the guides for the hands
You are now going to draw two more guide ellipses for the characters hands. Once again, look carefully at the shapes you are about to draw, one is a far flatter ellipse than the other. Notice how the one on the right intersects the two arm guides you have drawn and also just cuts ever so slightly into the first circle that you drew.

How to draw – Step 4
The fun part.
Now that you have all the guidelines drawn, or as I like to call them ‘the foundations’. Make sure that you are happy that they are a good representation of the guide picture of step 3. You are ready for the fun part, I thought that I would get you to do this bit next because you have spent so much time concentrating on the guide lines (hopefully) and you need some reward. We are going to add in the face detail into that first shape you drew, bringing life and soul into the character. Notice where the face details sit within the circle, before doing some hard lines do some more guide marks so that you are sure that face is in the right place in the circle. Ensure that the relationship between the individual elements are correct. Nice big thick eyebrow just above the half way line of the circle and slightly to the right. Upper nose line two thirds of the way along the eyebrow line, lower nose line probably higher that you first imagined, wide smile line just below the nose line but curls up rapidly to the right of the nose line giving the impression of the mouth heading away from us and around the other side of his face. Don’t forget that little shape for the ear, in line with his eyebrow line just above the centre line of the circle.

How to draw – Step 5
Shoulder and arms.
This bit is a little less challenging and will solidify the character a little more. Follow the guideline ellipses you have drawn and this step should be really simple for an accomplished artist that you are now becoming. The ‘scratchy’ line work helps to amplify the character of the caveman. You can achieve this by using an ink pen with a brush tip. See now how the guidelines that you have drawn really help you with getting the proportions of the character right when joining up the body parts. You will note that the line from the top of his head through his shoulder line is straight instead of showing a neck, this is because his neck is behind his head and not below in this illustration. It gives the classic thick-necked cave-man look.
You may have already seen artists using this method of drawing and wondered why they do it. They do it because it is essential when mapping out a drawing, when painting. An artist will do a very similar thing by painting large solid colour shapes at the outset of the painting to ensure that the proportions of the objects and the relationships between the objects is right from the earliest possible point in the process. After all, there is no point spending hours and hours on a painting where the basic elements or the structure is incorrect. Basic rule of drawing: Start with big statement shapes, then work towards the detail.

How to draw – Step 6
Getting those fingers right.
You now have two shapes to fit the fingers into. This particular illustration does not show thumbs, as they are below the object that he is leaning across, which gives the impression of the hands gripping. Draw some light portrait ellipses as a guide to help you with the positioning of these fingers before finally inking them in. Don’t forget the top of his forearm on the right, following the guides you have already drawn.

How to draw – Step 7
The finishing touches
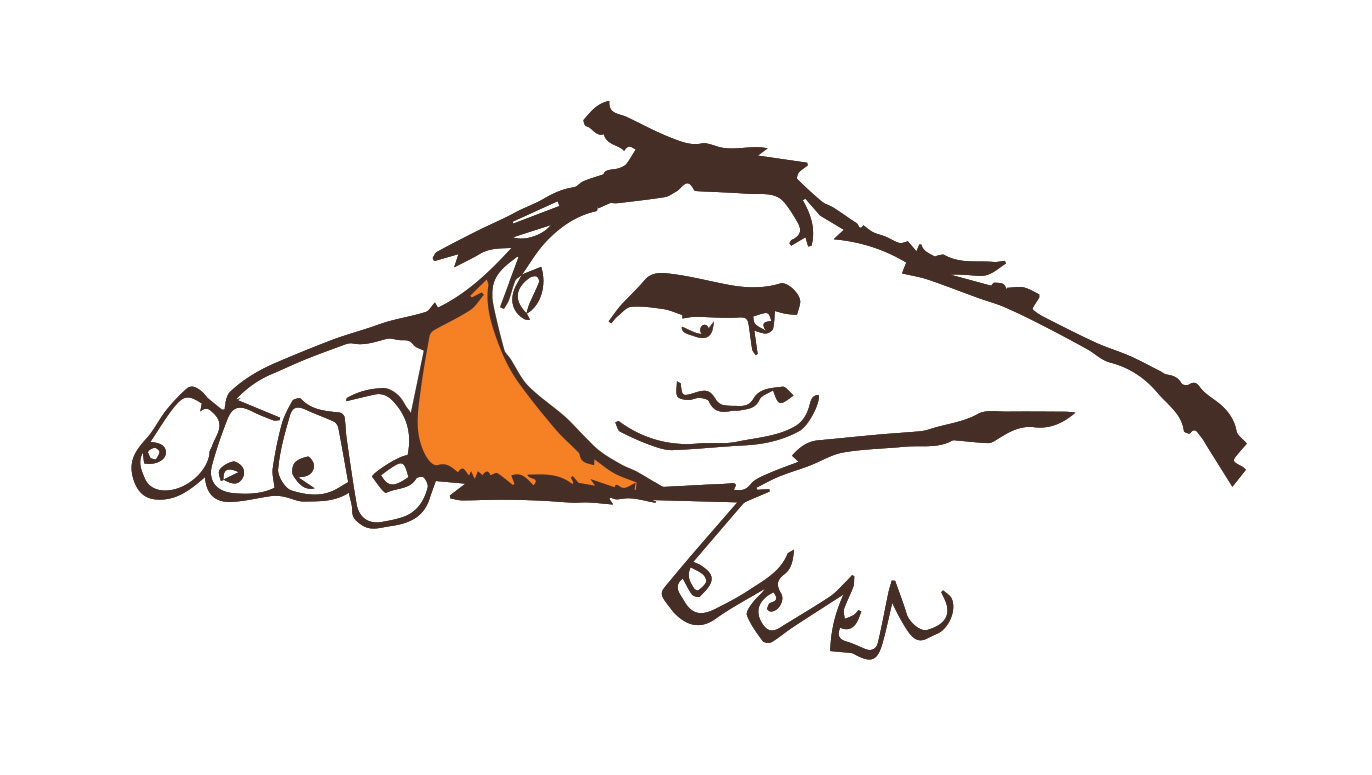
Nice and simple now, just the finishing touches 🙂 Follow the first guide you drew to add the line of his clothing and colour it in. Now you are finished! You now know how to draw something. Stand back and admire your handiwork. Easy innit?
I hope that you found this tutorial lesson interesting and informative.
